I've found that I can exploit my skills with Vectorworks to combine designs with photo images, making it much easier to show a designed feature "in situ" when it's not appropriate to develop a full design model.
As part of my garden designs, there’s almost always some form of structure required to provide a specific function – for example “built-in” tables & benches for a deck; planter-walls to help define a shape; a pergola over a pathway to frame a view and give vertical planting support; a gazebo to stop and take in the views and to act as a focal point itself; or a screening panel to enclose an area or separate it from another space with different character.
All of these items are part of the overall design concept, which is unique to that property, and will therefore “belong” to the garden even if they are made from widely-available component parts.
Sometimes though, either for practical reasons such as specific dimensions, or aesthetic reasons like needing a particular material / texture / form / etc, only a bespoke piece will work. Often this will be a timber or masonry construction, but I’ve also designed using plastics, ceramics and metals.
One recent example was a small screen panel which I commissioned from Colin Phillips, a designer-blacksmith.
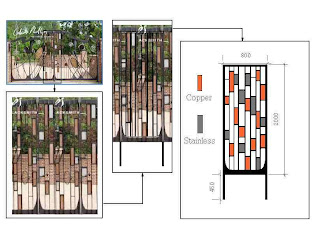
 The screen was needed to finish off the return edge alongside a small decked area which you can see in this picture.
I wanted to tie in with the terracotta colour of the alcove wall and the copper rain cups, so I decided on a series of randomly-sized copper & stainless steel sheets set inside a black steel framework – in a kind of “Mondrian meets Rennie Mackintosh” style.
The basis for this was taken, with his permission, from part of some gates pictured on Colin’s website.
As part of my garden designs, there’s almost always some form of structure required to provide a specific function – for example “built-in” tables & benches for a deck; planter-walls to help define a shape; a pergola over a pathway to frame a view and give vertical planting support; a gazebo to stop and take in the views and to act as a focal point itself; or a screening panel to enclose an area or separate it from another space with different character.
All of these items are part of the overall design concept, which is unique to that property, and will therefore “belong” to the garden even if they are made from widely-available component parts.
Sometimes though, either for practical reasons such as specific dimensions, or aesthetic reasons like needing a particular material / texture / form / etc, only a bespoke piece will work. Often this will be a timber or masonry construction, but I’ve also designed using plastics, ceramics and metals.
One recent example was a small screen panel which I commissioned from Colin Phillips, a designer-blacksmith.
 The screen was needed to finish off the return edge alongside a small decked area which you can see in this picture.
I wanted to tie in with the terracotta colour of the alcove wall and the copper rain cups, so I decided on a series of randomly-sized copper & stainless steel sheets set inside a black steel framework – in a kind of “Mondrian meets Rennie Mackintosh” style.
The basis for this was taken, with his permission, from part of some gates pictured on Colin’s website.
I thought it would be interesting to show how I took this through to the finished piece – all done using the Vectorworks CAD package, with Windows Photo Gallery to crop pictures – not even a hint of Photoshop!

First step was to copy the website picture to the Windows clipboard and paste in into a blank Vectorworks layer, which I then exported back as a JPEG image.
Next, I cropped the central bit of the gates, shown above as a black rectangular frame, using Windows Photo Gallery and imported this back into Vectorworks. I then used the Vectorworks “edit – duplicate” function to copy it, and shifted the duplicate sideways to create the rounded base shape with asymmetric left & right sides shown under the original picture of the gates. With these images selected, I used the “modify – scale objects” function to re-size the pictures so that the vertical dimension matched my requirements of 2 metres.
I could then trace over the image to get the basic “ladder” form that interested me before deleting the photo images of the gates and working on to produce my final design.
 Once the design was completed, I imported the original photo of the deck area to another layer, again used “modify – scale objects” to resize it - using the brickwork alongside the screen position as a measurement guide - and duplicated the screen design onto this layer, moving it around to superimpose it in the correct position.
Finally I cropped this layer, using a viewport, and printed it to show my client, before commissioning the piece.
The final picture is the finished install of the custom-made screen.

No comments:
Post a Comment