Wednesday, 3 November 2010

Biodiversity: Making a bug hotel

Around this time last year, I wrote a piece on the benefits (to wildlife) of not doing too much in the way of autumn garden tidying, and earlier this year I wrote about 2010 being the International Year of Biodiversity and how easy it is to contribute in our own gardens – so I thought you might like to see one of my own humble efforts – “The Crawl Inn”.


The Crawl Inn is a “bug hotel” – a place in the garden, loosely constructed from debris, intended to provide habitat for over-wintering of creepie-crawlie and buzzing insects. Most of these are highly beneficial to our gardens – either directly (e.g. pollinating insects and those such as ladybirds & lacewings which are predators for the less-welcome visitors like aphids) or indirectly (through forming part of the food chain for other insects, small mammals & birds).


Making a bug hotel is really easy, and it costs almost nothing, as well as being great fun for the kids! There are excellent instructions on the “buglife” website, and a Google search for “bug hotel” will also provide a multitude of examples and instructions for making shelters with varying degrees of “style” & ornamentation from all sorts of materials.

My own version was made as follows:

  1. Gather the materials –
    Some plastic mesh (about 1m x 1m), 3 lengths of timber batten about 1.2m (4’) long and a piece of exterior (marine) plywood about 450mm x 350mm (18” x 14”), plus some twist tie and a staple gun.
  2. Position one of the battens about 75mm (3”) from the end of the mesh, with the end of the batten flush with the edge of the mesh.
    Use the staple gun to tack the mesh onto the batten.

  3. Repeat this with a second batten at the other end of the mesh, then with the third batten roughly in the middle of the mesh.
  4. Roll the mesh to form a cylinder with the battens on the outside. Use a few strands of twist tie to join the mesh together between the 2 outer battens.

  5. Take the tube to the spot where you want the bug hotel – ideally where it’s not exposed to cold winds and where it’s partly shady & partly sunny.


  6. Hammer the long ends of the batten into the ground to make the cylinder self-supporting. It doesn’t matter if there’s a gap at the bottom between the mesh & the ground – that will give room for small mammals to use it too!


  7. Start to fill the tube with materials to make the hotel’s accommodation –
    dry dead leaves;
    broken bricks & paving;
    dead stems & twigs from plants;
    short lengths of hollow bamboo cane (use an offcut of plastic pipe or part of a drinks bottle to hold them together as a tight bundle);
    pieces of wood with various-sized holes drilled in them;
    short lengths of tree trunks or branches – especially with rough or flaking bark, large stones, etc.

  8. Almost anything will do – the objective is to create cracks & crevices and hollow spaces of different sizes to suit a whole range of creatures.


  9. Once the tube is full, use the sheet of plywood to add a “roof” to keep the hotel rooms dry. This could be just placed on top of the tube, with bricks or large stones to weight it down, but I simply drilled a couple of holes at diagonally opposite corners then threaded some twist tie through these and secured it to the plastic mesh.


  10. If you’re going to position your hotel on solid ground (e.g. paving), you’ll need to cut the battens the same length as the width of your mesh – hammering timber through the patio just won’t work!

  11. My finishing touches were to print off the name of my hotel “The Crawl Inn” and a “Vacancies” notice, together with the “helipad” landing sign, make them waterproof by laminating them in plastic, then using the staple gun to fix them to the battens & roof.


To quote from the buglife website “A bug-friendly garden is a wildlife-friendly garden so if you want a garden filled with life, you need to look after your bugs.” – so, what are you waiting for ... get cracking on your own “B&B for Bugs” before winter sets in!


Monday, 13 September 2010

The Japanese Garden, Van Nuys, LA

Another garden from my US trip was one we just “happened” on while staying overnight in Van Nuys, en route to Santa Barbara. The Rand MacNally map mentioned “Japanese Garden”, so we just had to investigate. It turned out to be a revelation, not only because of its integrity as a garden, but also for its conception as an engineering project.
Designed by Dr. Koichi Kawana, it is a 6.5 acre authentic Japanese garden. Dr. Kawana created more than a dozen Japanese gardens in the USA. What is surprising is that this one is part of the Tillman Water Reclamation Plant (yes, a sewage works!) which provides reclaimed water to much of the San Fernando Valley. Donald C. Tillman, City Engineer, had the idea for the garden, and continually pressed for its funding, until it was granted in 1979.

The garden includes a dry Zen meditation garden (karensansui), a wet strolling garden (chisen) and a tea house.

It was peaceful and tranquil on the beautiful day that we were there, and well worth a visit if you’re anywhere in LA. Please check the opening hours carefully, however, before you make a long journey.


Friday, 6 August 2010

The Getty Centre Garden

The Getty Centre is a modern art museum, opened in Brentwood, Los Angeles, in 1997.


It has a spectacular setting – perched on the Santa Monica Mountains foothills, overlooking Bel Air, Beverley Hills, Westwood, Century City and the San Diego freeway climbing through the mountains.

Although the campus is striking modern architecture, and the museum holds impressive collections of Western art from the middle ages to the present day, it was the garden which enthused me most.

The central garden was designed by American abstract-expressionist and installation artist Robert Irwin in 1992-97, working with the Getty foundation and with architect Richard Meier and landscape architects Spurlock-Poirier. Irwin, who was part of California’s “light & space” (minimalist) movement of the 1960s, described the garden as


"a sculpture in the form of a garden aspiring to be art"

aiming to provide the visitor with an experience of sights, sounds and scents, with design components selected to emphasize the interplay of light, colour & reflection.

It certainly struck me as a garden fully intended to work with the Getty Centre’s architecture.


Views of the white travertine buildings act as abstract sculptures backing the varied textures and organic forms of the landscaping & planting.


The garden occupies a natural ravine between the Museum and Research Institute buildings, covering an area of about 3 acres (1.25 hectares) which forms a small part of the overall 110-acre landscaped site. The garden entrance is a tree-lined walkway of angled herringbone stone paving which criss-crosses a stream as it cascades down through the ravine.


At the top end, the stream is contained within granite tile sides, creating a V-shaped wide rill, with large, irregular-shaped granite boulders in the stream bed where the water swirls over and around them. As the stream descends, and the path winds back & forth over herringbone timber bridges, its texture changes to granite sets and then to granite “tile on edge” with wide stone steps forming the banks between bridges. The stream eventually crosses a large terrace before falling as a short stair-cascade into a circular reflecting pool which holds a labyrinthine round-topped Azalea hedge growing about 75cm above the water surface.


Surrounding this pool are terraces of mixed planting, flanked by low Corten steel retaining walls and compacted gravel paths which ramp back & forth in long arcs between levels, following the style of the stream path and the lines of the pool and water parterre.

The central terrace, between the stream path and the pool, features Bougainvillea-clothed rusted steel “mushrooms” that create shady tree-like shapes with seating beneath their cover. Corten steel is again used to form organic, curvy retaining walls between the planted beds and the gently mounding grass lawns that stretch beyond to the campus buildings. Carved into the terrace is designer Irwin’s motto “always changing, never twice the same” – a key feature of the planting design which includes over 500 species (no, I didn't count them all!) to ensure variety & succession.


Clearly, there was no shortage of funding in the development of this garden (which took almost 2 years to construct in 1997-97), nor for its subsequent upkeep, with quality materials & craftsmanship evident in both the hard and soft landscaping. I did find it inspirational and could see how some of its features could be emulated on a smaller scale – with the water maze reminding me of my own design ”AQUA ZY Garden” from my college days!


Linked to the central garden is a small sculpture park – but I was disappointed with this.

Not so much in the artworks themselves, but with their setting – they seemed, to me, to occupy a piece of “left over” ground, with no thought to the background or direction of (natural) lighting.

Perhaps some additional softscape design could improve this!


The Getty Centre is at 1200 Getty Centre Drive, Los Angeles, and is free admission (though it does cost a few dollars to park) all year, except for Mondays & holidays. For more information visit www.getty.edu/visit/ and www.getty.edu/visit/see_do/gardens.html

Hello again - I'm back!

If you're one of the thousands of people who depend upon my weekly posts for your entertainment (!!!), my apologies for the gap - I've been on holiday.

You may recall my quip earlier this year that "I shouldn't be here" when my holiday plans were scuppered by the Icelandic volcano ash cloud which closed down UK air space a few minutes before our flight was due to leave - we were actually on-board, had heard the safety talk, and were planning our in-flight movies, etc. Well, this time we made it. We had almost 4 weeks doing a fly-drive trip out of Los Angeles, through the Mojave desert to the Grand Canyon and Las Vegas before heading back to the Californian coast at Santa Barbara and back to LA. I guess the 2100 miles we drove, and the flight itself, puts me in something of a carbon debt, so I need to get planting even more trees!

I must praise the ALK "CoPilot Live - North America" sat-nav app on my iPhone which only cost me £12 and faultlessly guided us around for free - the maps are loaded onto the iPhone, so it doesn't need a data connection after the initial WiFi connection (free at MacDonalds or Starbucks!) to let it get its initial bearings. "Park'n Find" was also useful for helping us back to our hire car in the huge parking structures at theme parks (we did "Universal Studios") and the large hotels in Las Vegas & Hollywood.

As well as the varied natural terrain, including US National Parks, between cities, we did get to see a few gardens along the way, so over my next few posts I'll cover some that I hope will be of interest.

Meanwhile, those clever guys at Google Blogger have been busy releasing a bunch of new features, so I've given my blog a "makeover" including a new layout/style, shifted some of the gadgets around on the right-hand side, added a bit more about me to the profile description (sorry it looks a bit messsy, can't find how to "justify" it) and moved the Facebook/Twitter "share" buttons to the new share facility beneath each post - so it's much easier for you to share individual articles you like via email, Facebook, Twitter, Google Buzz, etc. I've also added the "instant feedback" buttons (funny/interesting/cool) so you can just click these if the fancy takes you.

Hope you like!

Friday, 2 July 2010

Designing a small garden - part 4

This is the 4th (and final!) part of my thoughts on the design of small gardens theme.

The earlier parts are the 3 posts immediately before this one, and can be reached by clicking on these links ...

Part 1 - introduction to why small gardens need designing;
Part 2 - lose the boundaries, borrowed views & landscape, using 3 dimensions;
Part 3 - keep it simple, maximise space usefulness, optical illusions;
Part 4 follows - keep it interesting, growing for the table and utility issues.


7. Keep it interesting:

A garden space planted entirely with unchanging, neatly clipped, evergreen hedging can be a tranquil place to relax, but it will lack the seasonal changes which I think bring vitality to a garden.

A very small garden may not be able to sustain too many changes in form – rounded, conical, arching, cylindrical, horizontal-tiered, vase-like, etc – without becoming too “busy” and seeming cluttered, but changes of texture and leaf colour can add enough variety to ensure it’s not a boring space. Restrained use of flower “fireworks” and foliage changes can create seasonal highlights that keep the interest going.

If you’re using a small tree, try to get value from it with blossom, leaf colour changes and berries – take a look at Amelanchier, Sorbus or Euonymus – or try one with interesting winter bark, such as the Paper-Bark Maple (Acer griseum). Click here for more information on keeping your garden interesting through the winter.


A tree will also provide food and/or habitat for wildlife to add interest to your garden, especially if you allow some of the “hidden corner” beneath it to be old branches, dry dead leaves, or a “bug hotel” made from old bricks, straw, branches, etc contained in some wire or plastic mesh. These will certainly help support insects, birds and maybe frogs/toads or a hedgehog. This year is the International Year of Biodiversity - my post on this explains more about the importance of gardens to wildlife, and how to attract it to your space.


Don’t forget the value of the view out to your small garden from indoors – especially the night-time view, where “nightscape” lighting will be much more economical to achieve than in a larger garden! Click here for more information on garden lighting.

8. Growing for the table:

A small garden is unlikely to give you scope for a regular vegetable garden, but you can still produce some food – espaliered fruit (apples, pears, cherries, kiwi) grown against a sunny house wall; dwarf fruit trees in patio containers (peaches or nectarines); window-ledge containers for herbs, salad crops or stir-fry leaves; potato barrels, strawberry planters or tomatoes in hanging baskets.

Follow these links for more information on window ledge planting and edible flowers.


9. Utility issues:

Practicalities also need to be considered. Unless it’s a small front garden we’re addressing, you’ll probably need a washing line of some kind. Rotary lines are economical in space and can be removed out of the way when not required. Another discreet option is a retractable pull-out line with the spool fixed to the house wall and the extended end hooked onto another wall, well-fixed post, or (perhaps) a strong tree branch.

Waste bins / wheelie bins may need to be accommodated, but could be out of sight behind a hedge or trellis screen.


A compost bin is still a good idea, even in a small garden. If there’s not space to hide a conventional bin (ideally, a timber structure with air gaps rather than a closed plastic composter) there are ornamental “bee-hive” types – just Google “bee hive composter” for retailers.


Unless your garden planting is exceptionally drought-tolerant, plants will need watering in hot/dry periods, especially those in containers & hanging baskets. This is much less work in a small garden! A small garden also makes it very easy to include irrigation for patio containers/planters, hanging baskets and inset borders using a solid-walled hose from the water source taken around the periphery, with smaller tubes punched into the hose taking water to adjustable micro-sprinklers in the pots. These drip-irrigation systems from “Hozelock” are readily available at garden centres and DIY stores, are relatively inexpensive, and can be easily automated with a battery-powered timer at the water tap. Even better, but more expensive, are automatic solar-powered pumps attached to rainwater harvesting butts, such as “WaterWand”.


For collecting rainwater in a smaller garden, there are unobtrusive wall-mounted slimline butts such as the “Prestige” from waterbuttsdirect and others.


That’s the end of my article on designing a small garden - you can reach the other parts via the links at the top of this post, or by scrolling on down through my blog.


If you’re inspired by these ideas to have a more adventurous attempt at designing your small garden – great! If you’re daunted by it and would like some professional help click here to get in touch!

Designing a small garden - part 3

This is the third part of my thoughts on the design of small gardens.

The other parts can be reached by clicking on these links ...

Part 1 - an introduction to why small gardens need designing;
Part 2 - lose the boundaries, borrowed views & landscape, using 3 dimensions;
Part 3 follows, covering keep it simple, maximise space usefulness, optical illusions;
Part 4 - keep it interesting, growing for the table and utility issues.


Here goes ...


4. Keep it simple!

In a small space it’s best to stick to simple, bold shapes – definite circles, rectangles & arcs, rather than serpentine, organic shapes which need space to allow one’s eye to follow their sweep. If the plot is an odd shape use the “lose the boundaries” approach, as described in part 2 of this series, to re-shape it so that the space within the planting has simpler, more definite geometry. This also makes it look thought about when compared to a patch of lawn or gravel “left over” from the shape of the other features.


Don't try to cram in too much - if each direction that you look in has several focal features competing for your attention, there's no restfulness and the whole thing becomes cluttered and feels cramped. Try to keep the main functional spaces open with low-level planting and features.


In similar vein, avoid too many variations in materials - “less is more”. Using the same basic surfacing throughout (i.e. the deck / patio / paths) will unify the space and make it seem larger than one which has timber & paving & gravel & brick & stone & concrete & grass, etc. This works in much the same way that having the doors open and the same flooring throughout a small house can make it seem larger.


5. Maximise the usefulness of space:


Do you really need that bit of lawn?

OK, you need a flat surface for practical usage like sitting and dining spaces, as well as the aesthetic purpose of balancing the planting masses, and a change of texture from deck or paving can add interest – but that can be achieved with gravel or slate chips or, better still, with a pebble/cobbles mix to give more interesting variation in texture - perhaps planted through with small ornamental grasses or perennials around a focal point boulder, bird bath or sculptural piece.


Grass is quite poor ecological value and takes a lot of chemical & water input to remain a good lawn throughout the year – as well as a lot of work.
It can become really tedious to get a mower out for a very small lawn!


In a small garden you may still have distinct areas – dining/BBQ, sun-lounging, shady seating for reading, chatting & socialising. You might achieve this with a very simple rectangular shape which has some parts “cut away” – this adds interest to the shape & sub-divides it to create the various functional areas. The cut-aways could be features such as a firepit or BBQ, herb bed, raised planter, water feature, etc.


If the space is really small, consider using “built-in” features, rather than free-standing ones, to keep the space open for movement and allow you to bespoke the size & scale of the features.


If the plot is long & narrow, or short & wide, setting the main rectangular shapes diagonally, rather than parallel to the house, can increase the apparent length of the shorter dimension. A long, narrow space can also be made to seem less like a corridor by using planting or trellising to partially separate sections of the length into “rooms”, perhaps with views framed through archways to focal features in the next room, so creating the “what’s down there?” added interest.


Do you really need paths connecting the areas, or could a path be “suggested” along the edge of a shape or by stepping stones? When planning the arrangement, remember that a narrow strip encourages brisk movement along the line, a wider strip is still “directional”, but allows a more leisurely pace of transition – whereas a squared (or circular) shape suggests a lack of movement, i.e. a resting place such as a patio.


If you have a flat, or shallow-pitched, garage, shed or house extension, why not consider a green roof (click here for more information) to add more planting space & ecological value?


6. Exploit optical illusions:

This is a biggy!

The directional effect of shapes described above can also work with materials, such as the laying patterns for brickwork / paving and especially for decking. The human brain is always looking for patterns and the eye will tend to follow linear features – so a deck with boards running across the line of sight will emphasize the width of the space, whilst having the boards running with the line of sight will emphasize its length. This effect is seen in clothing design, where striped vs. hooped patterns complement different figures.


Laying deck boards diagonally can make a much more interesting scheme, especially if combined with a change to the opposite diagonal on a split-level deck – and can serve to direct the eye to a focal feature. It’s also practical in that boards are cut obliquely to fit the edges so, if they aren’t perfectly square to the adjacent building walls, there’s no “run out” gap which looks dreadful.


Using horizontal linear timber strips instead of conventional square or diamond pattern trellis for screens also has this directional aspect and can “stretch” a short boundary.


In this example, grooved deck boards are used to give the same effect, and also provide unity with the decked surface.


Other optical “cheats” can be made using mirrors to create false windows or doors in walls which can add apparent depth and provide that “what’s through there?” appeal.


In this picture they are used in a semi-formal arrangement to break up a dark, unattractive boundary and add the impression of depth beyond.


They also work really well when the mirror edges are concealed by other planting, or within false framing (e.g. “perspective” panels), and the reflection from the mirror is another part of the garden space, not the viewer – i.e. ensure the mirror is angled slightly. A large mirror, perhaps with ivy trailing over it, at the back of an arch can make it appear deeper – more like a pergola offering a walk-through to another part of the garden space.

Mirrors will always need to have a rigid surface to mount them on, both to protect them from cracking and to prevent movement in the wind - so a free-standing mirror needs at least 12mm marine-ply backing, attached to well-fixed posts. If the reflection is to be seen from some distance away (e.g. from inside the house), make sure it’s very optically flat – slight ripples in the glass produce only minor distortion when seen from a few feet distance, but give a “hall of mirrors” nightmare when seen from 20 or 30 feet!

Another optical trick is using a series of vertical poles where the gap between them reduces along the run, and/or, the poles themselves reduce in height & thickness. This produces a very exaggerated perspective which makes the depth along the run look much greater. If you use this beware of the distorted look when viewed from the opposite direction!


Wall murals may not provide realistic illusions, but can certainly improve the view of a close, uninteresting, neighbouring wall.


Making good decisions with your planting can also help in this optical illusion field.


Bright colours such as orange, yellow & red “advance” – i.e. they seem to jump out at you, so the object appears closer – useful for “shortening” that long, narrow, corridor space. Conversely, muted colours such as blue, mauve, silver/grey and pale green “recede” – making the object appear further away. The effect of colour also changes with the daylight – oranges, reds and yellows “sing out” at dusk, especially when there’s a good red sunset.

Texture has similar visual properties – small-leafed plants provide a “bland” uniform texture which recedes, whereas large-leafed plants with a more open, architectural form advance, making them good focal points. Judicious use of these characteristics, blending in a few advancing features against a receding background can give a greater sense of depth to the view and add to the illusion of space.


The other parts of this series can be reached by scrolling through my blog, or by clicking the links at the top of this post.


Thanks for persevering!

Thursday, 1 July 2010

Designing a small garden - part 2

This is the second part of my thoughts on the design of small gardens.

The other parts can be reached by clicking on these links ...

Part 1 - an introduction to why small gardens need designing;
Part 2 follows, covering lose the boundaries, borrowed views & landscape, using 3 dimensions;
Part 3 - keep it simple, maximise space usefulness, optical illusions;
Part 4 - keep it interesting, growing for the table and utility issues.


Following on from my introduction about why small gardens still need to be designed, here are my first 3 guidelines for anyone who wants to do the design themselves, or to understand some of the thinking that a professional designer will do for you:


1. Lose the boundaries:
Some people think that having borders planted with medium-tall shrubs would “shrink” the available space and feel claustrophobic, but such planting can hide the walls / fences so that the boundary no longer exists – and if there’s no visible boundary your imagination will let you perceive the space as being bigger, not smaller. This can work particularly well if your neighbour (on the other side of the wall/fence) has planting which is taller than your own ... which leads on to ...


2. “Borrow” outside views & landscape:
If there’s a fabulous view outside your garden, you don’t need me to tell you it's OK to break the first guideline and not to hide it – instead, you can organise planting & features to minimise the barrier (fence, etc) between your space and the view, and to “frame” the view to enhance the feeling that it’s part of your visual space. In the classic large estate gardens, the usual device for separating the formal gardens from the pasture land or deer park beyond was the “ha ha” – a wall which is at ground level on the viewing side (formal garden) but which is at the edge of a ditch on the pasture side. You probably won’t be able to do this, but the principle of a near-invisible boundary could be achieved with basic post and wire mesh fencing.


Of course, great views don’t have to be the rural idyll – cityscape views can be sensational too – especially if there’s some interesting architecture, maybe a river, bridge or city park, or even some kinds of industrial architecture to look out on. After all, that’s one of the reasons why rooftop gardens are popular with city dwellers.


If you’re part of a suburban estate, with nothing worth looking out on, your “views” will need to be within your garden space and you’ll probably want reasonably high walls or fencing for security & privacy – but you may still be able to “borrow” bits from outside your space.


Does your neighbourhood have trees that you can “adopt” by visually linking them to your plan? Concealing the boundary fence using shrubs or small trees within your garden to sweep the eye up to the neighbouring trees will bring them into play as part of your scheme.


3. Use 3 dimensions:
As just noted in guideline 2, pay attention to the vertical space.
Use a small tree (or, if space permits, a group of small trees, or a multi-stem tree), with under-planting, in as deep a border as you can make, to gain maximum use of planting space. With the exception of very thirsty trees such as Poplar and Willow species (which are far too big for a small garden anyway), a tree that’s of a size to be in scale with your garden is unlikely to cause damage to modern 1-metre depth foundations – but, if you’re concerned about the proximity of a tree to your house or garage, get some professional advice from a qualified designer, tree surgeon or tree nursery.
If a tree isn’t possible, use pergola or screens to support climbing plants, to add a shady spot or to create depth through the light and shade patterns. Make use of tiered pots or planters to gain height and attention for smaller plants.


Please scroll through my blog for the other parts of this series, or use the links at the top of this post.


Thanks for dropping by!

Wednesday, 30 June 2010

Designing a small garden (1)

This is the first part of my thoughts on the design of small gardens.

The other parts can be reached by clicking on these links ...

Part 1 - Follows and is an introduction to why small gardens need designing;
Part 2 - lose the boundaries, borrowed views & landscape, using 3 dimensions;
Part 3 - keep it simple, maximise space usefulness, optical illusions;
Part 4 - keep it interesting, growing for the table and utility issues.


In social conversations, such as when chatting about "what do you do?", I sometimes get the reaction “oh, my garden’s too small to need designing” – but I beg to differ!


I do this based on 2 axioms:
  • firstly that the most successful way of designing a large garden is to link together a series of smaller, human-scale, self-contained areas – often referred to as garden “rooms” – an approach used in the classic English gardens at Hidcote and Sissinghurst. The design of the garden as a whole is about the location, shape, proportion and flow of these smaller spaces and the routes which connect them – but the character of each smaller space is unique, so the task becomes one of designing a series of small gardens;

  • secondly, even with a small garden, you’re as entitled as anyone else to desire an outside space that’s beautiful, enjoyable, restful, productive, property-enhancing, ... and so on.


Obviously, a small garden has a certain sense of scale and doesn’t provide the opportunity to have large trees, massed shrub plantings, swathes of bulky ornamental grasses, a wildflower meadow or an extensive pond – features that may well be used as part of the overall landscape between the garden rooms in larger estates – but that doesn’t mean they are free of design challenges. The training & experience of a professional garden designer can help to get the best from a small space in terms of usefulness, adaptability and adding value to the property.


If you fancy having a go yourself at achieving a more attractive result than the “2-foot-wide flower border around the fence with a randomly-shaped grass lawn alongside the builder’s patio” that’s often the norm for small suburban gardens, the other parts of this article will give a series of guidelines that will help you get there. You can easily reach them by clicking on the links at the top of this post.

Tuesday, 1 June 2010

Remarkable Renderworks by Daniel Jansenson


Renderworks is a “bolt-on” option to the Vectorworks computer aided design system from Nemetschek, of which I’ve previously written (see Residential Garden Design and Animations). Once a 3D model has been developed with Vectorworks, using the Renderworks component brings presentation images of the design to life - by adding textures to the surfaces of objects and creating depth through the lighting tools which give both general illumination to the scene and modelling to the highlight/shadow details.

Daniel Jansenson prepared this book for Nemetschek as part of their tutorial series. He is well-qualified for this, being an architect in private practice, a long-time Vectorworks user and a teacher of both Vectorworks and Renderworks. He’s also author of the earlier eBook “The Renderworks Recipe Book”.


Remarkable Renderworks is sub-titled “An Introduction to the Basics”, but – although it does indeed serve to help novices get to grips with Renderworks – it’s not a Vectorworks primer and, as stated in Daniel’s introduction, the manual is “intended for the Renderworks user who already has some experience with Vectorworks”. That said, I find it to be more than just a primer for Renderworks too – it has value as both revision & skills enhancement to those who already have some familiarity and experience with the Renderworks software.

Format and content ...

In common with other tutorial manuals from Nemetschek, the book is an excellent, A5-sized, spiral-bound, format - which lets it fold flat and occupy minimal desk space when working at a computer. It has some 33 chapters, or topics, which guide readers from the simplest forms of rendering through to the use of built-in (default) textures, creating your own custom textures, and applying textures to specific types of 3D objects. From here it goes on to explain lighting types and effects, for both interior & exterior scenes, before concluding with a treatise on the system’s capability to produce supremely realistic images via the Custom Renderworks & Custom Radiosity tools - and the trade-offs between ultimate realism and image processing time. Throughout the book there are high quality colour images of screen segments which make it very easy to follow through the exercises that are used to provide the tutorial.


Exercises and Software Versions ...

The exercise files are provided on a CD-ROM which accompanies the book. Although there’s no mention of software versions, as a newly published tutorial it is, naturally, designed to work with the current software, i.e. Vectorworks/Renderworks 2010, and the files are 2010 format – so if you have a prior version you will not be able to use them. Pre-2010 users can still get some benefit – anyone with Vectorworks experience can easily re-create the early chapters' exercise files. For later chapters, with more complex exercises, it may be more effective to just follow the principles and apply them to some of your own work – but note that there are significant changes and improvements to the tools and methods of working in the 2010 version which the tutorial is based upon.

.

At first, I was disappointed that the exercises did not represent a journey through a real-life project - being instead a series of mainly unrelated, simple, abstract models. However, after working through the book, I now recognise how well these are used to describe & teach the concepts – something which may have been more difficult to achieve, and perhaps more confusing, in a real-life example. It’s also worth saying that Renderworks is applicable to Vectorworks Fundamentals users, as well as those with Design-series options such as Architect, Landmark and Machine Design, so using abstract examples makes it more universal as a tutorial.

.

The more complex forms of light rendering are most appropriate to building interiors and the exercises are based on this. There is a chapter on exterior scene lighting, though this doesn’t add much to Tamsin Slatter’s excellent book on Residential Garden Design.


There are some improvements I can suggest for the next revision ...


  • There’s little reference to the wide range of (non-default) ready-made texture libraries which ship with the Vectorworks/Renderworks software, so you may be left thinking there’s a lot of work you have to do for yourself, which may not actually be the case.


  • As a garden designer, I’d have liked more information on using Renderworks to show exterior schemes in both daylight and “nightscape” scenes and some discussion of the effects / limitations of lighting used with the ”Image Props” that represent planting in 3D models.


  • My major criticism is the lack of an index, which limits its usefulness as a reference work. It is possible to skip-read chapters (which are only about 5-6 pages each) after skimming down the Table of Contents for a topic of concern, but it’s a tedious way of working and (unlike Tamsin’s book) the CD-ROM doesn’t include a searchable PDF version of the manual.

Conclusions:

Would I recommend this book? Yes!


Who would benefit from it? Anyone who already has enough Vectorworks experience to build 3D models and who wants to leverage their investment to produce, or improve the quality of, their design presentation images – whether they’re working in the field of architecture, interiors, or, like me, landscape/garden design.


Where can you get it? From Nemetschek.


.

Steve Rice, Blooming Good Gardens, Southampton, UK


Friday, 28 May 2010

Concrete Jungle: biodiversity through school gardens

Concrete Jungle is a new initiative to encourage schools to plant flowers and grow vegetables to create wildlife havens in their grounds. I’ve blogged before about the International Year of Biodiversity of which this campaign is a part. Concrete Jungle has been developed by Cool It Schools, a global programme for young people, encouraging them to do something about climate change. There’s a downloadable teacher’s pack with suggestions for developing a garden, and lesson plans and ideas to interest students.
I was particularly interested in this, since I’ve been developing a wildlife garden with a school which has now made real progress. After I set out the plot a group of volunteers set to with enthusiasm, and its hoped that the project will be completed this year.

Once schools have signed up with the Concrete Jungle campaign they can register the dimensions of their garden and use the site to show the progress they are making.

Monday, 17 May 2010

Birds in the garden

We've been having fun watching the birds on our feeders lately. One blackbird took a while learning how to get to the fat ball: approaching it from various angles he failed to get a grip; then he hovered alongside it, grabbing a bite before he fell back onto the ground; finally he learnt to land on the fat ball itself, and was able to nibble away easily.


The collared doves and blue tits have also been avid feeders.


If you feed the birds, don't forget to clean the feeders regularly to prevent disease. See the RSPB website for more information.

Tuesday, 4 May 2010

A great day out...Blashford Lakes

Sadly unable to get away on holiday, due to volcanic ash, we had the opportunity to explore some places closer to home, and discovered Blashford Lakes, near Ringwood. The weather that week was lovely – a real taste of summer.


The lakes are flooded gravel pits, managed by The Hampshire and Isle of Wight Wildlife Trust for the benefit of people and wildlife. There are 8 km of pathways round the reserve, most of them wheelchair-accessible, with hides for viewing the wildlife on and around the lakes (ramps also make the hides accessible). We had a wonderful time wandering through the woodland, and sitting in a couple of the hides, trying to identify the water fowl from the useful posters displayed on the walls. We saw goldeneye, coots, Canada geese, and swans, as well as a couple of scuttling rabbits on the bank. We also enjoyed watching the whirling house and sand martins nesting in the man-made walls alongside one of the hides. Diaries are left for visitors to record what they saw on particular days, and it’s fascinating to look through and discover what was seen at different times of the year.


I recommend taking a picnic – there are benches at frequent intervals along the trails, and picnic tables outside one of the education centres. We omitted to do that at first. Having arrived in the morning and liking it so much, we went off to buy food, and then came back for the afternoon. There are guided walks, talks and family events throughout the year, and courses for adults, including topics such as wild flowers and photography.


You can visit the lakes free-of-charge, although we were so delighted, we left a donation, since it’s a charitable concern. Although there are car parks, the Trust recommends walking or cycling. Blashford Lakes can be found two miles north of Ringwood on the A338 Ringwood-Salisbury Road, New Forest OS Map Grid Ref. SU 151 079.

Monday, 19 April 2010

Rain Garden Success

I shouldn't be here blogging. I should be in California, but I think something went wrong with the translation when we asked the Icelanders to "please give us back our cash"!


Back in August last year, I blogged the article on Rain Gardens which I'd written for my local newsletter. I've just written a follow up piece to say how the garden "performed" through the winter, so here it is:


As we’ve now come through the winter and spring is with us at last, I thought you might be interested to know how it got on. Well, I’m pleased to say it’s good news! The rain cups looked terrific, both in gentle rain – when the water trickled and splashed through - and in heavy downpours – when it formed a solid column through the centre of the rain cups. The rain cups also had another practical use – in light rain or drizzle, when it wasn’t easy to tell whether it was raining or not, a glance through the window at them would readily give the answer, as directing the run-off from part of my bungalow roof through them “magnified” the rainfall effect. In heavy / sustained rain, the rill and rain garden do flood, as intended, covering the cobbles and (apologies to residents in Peterscroft, etc for “rubbing it in”) the ground beneath the rain garden is sufficiently permeable to allow this ponding to infiltrate and clear in about 6-12 hours after the rain stops.


So the mechanics of the rainwater collection and dissipation work fine, but what about the rain garden plants – how did they cope with continual flooding?


Once again, I’m happy to say, mainly successful. All but two of the species have come through and are now re-growing strongly. The ones which failed are a Verbascum (which I didn’t really expect would survive, and only included as a pretty summer plant with height) and a Hebe (H. carnea ‘Varigata’) which isn’t showing any signs of life, and was probably a poor choice – even though I’d planted it at the edge where it was less prone to flooding. Maybe it was the frosts rather than the wet which did for it? The successful plants, which “baked” through the end of summer last year, and survived the flooding of the winter, are: Calamagrostis acutiflora, Campanula lactiflora ‘Loddon Anna’, Carex ‘Evergold’, Cornus alba ‘Aurea’, Hemerocallis ‘Crimson Pirate’, Hypericum inodorum ‘Magical Red Star’, Pennisetum ‘Red Buttons’, Philadelphus ‘Belle Etoile’, Physocarpus ‘Diabolo’, Rudbeckia fulgida ‘Goldsturm’, Sambucus ‘Black Lace’, Sedum ‘Xenox’ and Tradescantia ‘Sweet Kate’. I can’t guarantee that these would always survive in extreme conditions, but you might like to investigate them if you have difficult areas to plant.


Another part of the change to my front garden was laying a decked pathway to a small decked sitting area in the “alcove” of the bungalow. For this I used “Millboard” composite decking - which has the look of old oak boards but is, in fact, manufactured from waste hardwood and recycled plastic. This has the advantage of being very long life, doesn’t warp, split, rot or fade and, unlike timber decking, is very non-slip. It’s also claimed to be a low-energy manufacturing process and, as the boards don’t need any oil or chemical treatments, seemed to me to have fairly good sustainability credentials. The purpose of the small sitting deck, which faces to the west, was to allow us to glory in the late afternoon / evening sun after it’s left our back garden. Once we’d overcome our initial reticence at being “on display” in the front garden, we found it to be a really good social feature – with people passing by stopping to chat and neighbours joining us for a cuppa or glass of wine.


We’ve recently completed this feature with a copper and stainless steel screen panel at the edge of the sitting deck. I commissioned the panel from my designer-blacksmith neighbour, Colin Phillips, having designed it myself based on part of some gates which Colin had previously made. You can see the genesis of this on my last blog post.


The final piece of redesign for this section of my garden was stripping away most of the lawn to give wider borders around the rain garden and decked path. These were very successful last summer - with flowers such as Borage, Nasturtium and California Poppy providing nectar sources for bees and butterflies. I’ve now added a series of “Minarette” fruit trees (Cherries, Gages and Plums) and a small standard Cherry. I know that it wouldn’t look good to protect these with netting in my front garden, so I reckon to share any crops with the birds – part of my contribution to International Year of Biodiversity!


If you’ve not heard of the latter, 2010 has been designated “International Year of Biodiversity”, by the United Nations, to call attention to the accelerating decline in biodiversity – mainly through human activities such as industrial monoculture food growing, pesticide usage and destruction of habitat. The retention of diverse flora & fauna throughout the world is vital to the human species, as much as to other living creatures, as we depend upon networks of other plants and animals for our food, energy and medicines. To find out more about “IYB” and how you could help please visit my previous blog piece

Thursday, 1 April 2010

Using Vectorworks to Montage Designs & Photos

I've found that I can exploit my skills with Vectorworks to combine designs with photo images, making it much easier to show a designed feature "in situ" when it's not appropriate to develop a full design model.

As part of my garden designs, there’s almost always some form of structure required to provide a specific function – for example “built-in” tables & benches for a deck; planter-walls to help define a shape; a pergola over a pathway to frame a view and give vertical planting support; a gazebo to stop and take in the views and to act as a focal point itself; or a screening panel to enclose an area or separate it from another space with different character.

All of these items are part of the overall design concept, which is unique to that property, and will therefore “belong” to the garden even if they are made from widely-available component parts.

Sometimes though, either for practical reasons such as specific dimensions, or aesthetic reasons like needing a particular material / texture / form / etc, only a bespoke piece will work. Often this will be a timber or masonry construction, but I’ve also designed using plastics, ceramics and metals.

One recent example was a small screen panel which I commissioned from Colin Phillips, a designer-blacksmith.

The screen was needed to finish off the return edge alongside a small decked area which you can see in this picture.

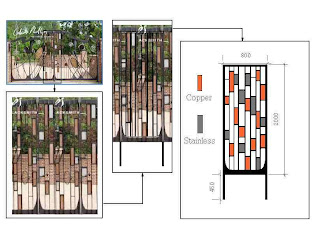
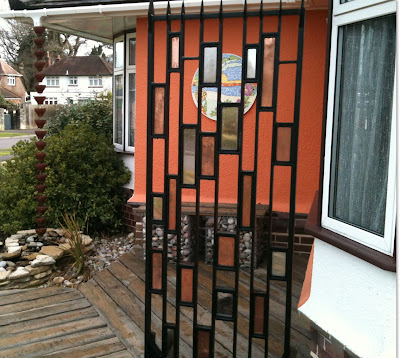
I wanted to tie in with the terracotta colour of the alcove wall and the copper rain cups, so I decided on a series of randomly-sized copper & stainless steel sheets set inside a black steel framework – in a kind of “Mondrian meets Rennie Mackintosh” style.

The basis for this was taken, with his permission, from part of some gates pictured on Colin’s website.


I thought it would be interesting to show how I took this through to the finished piece – all done using the Vectorworks CAD package, with Windows Photo Gallery to crop pictures – not even a hint of Photoshop!


First step was to copy the website picture to the Windows clipboard and paste in into a blank Vectorworks layer, which I then exported back as a JPEG image.

Next, I cropped the central bit of the gates, shown above as a black rectangular frame, using Windows Photo Gallery and imported this back into Vectorworks. I then used the Vectorworks “edit – duplicate” function to copy it, and shifted the duplicate sideways to create the rounded base shape with asymmetric left & right sides shown under the original picture of the gates. With these images selected, I used the “modify – scale objects” function to re-size the pictures so that the vertical dimension matched my requirements of 2 metres.

I could then trace over the image to get the basic “ladder” form that interested me before deleting the photo images of the gates and working on to produce my final design.


Once the design was completed, I imported the original photo of the deck area to another layer, again used “modify – scale objects” to resize it - using the brickwork alongside the screen position as a measurement guide - and duplicated the screen design onto this layer, moving it around to superimpose it in the correct position.


Finally I cropped this layer, using a viewport, and printed it to show my client, before commissioning the piece.


The final picture is the finished install of the custom-made screen.


Sunday, 21 March 2010

Sport Relief

I just spent an unusual but worthwhile Sunday, taking part in the Sport Relief Mile (well, three miles, actually) challenge, joining thousands of other people raising money for worthy causes both here, and overseas. My three mile route took place round the parks in Southampton where there was a wide diversity of participants: all ages, serious athletes, able-bodied, disabled. Some ran, others walked; one woman using a walking frame took her own time to complete the course. Take a look here:


Thank you to everyone who sponsored me. If you haven't done so, but would like to, please go to this link.