Wednesday, 30 June 2010

Designing a small garden (1)

This is the first part of my thoughts on the design of small gardens.

The other parts can be reached by clicking on these links ...

Part 1 - Follows and is an introduction to why small gardens need designing;
Part 2 - lose the boundaries, borrowed views & landscape, using 3 dimensions;
Part 3 - keep it simple, maximise space usefulness, optical illusions;
Part 4 - keep it interesting, growing for the table and utility issues.


In social conversations, such as when chatting about "what do you do?", I sometimes get the reaction “oh, my garden’s too small to need designing” – but I beg to differ!


I do this based on 2 axioms:
  • firstly that the most successful way of designing a large garden is to link together a series of smaller, human-scale, self-contained areas – often referred to as garden “rooms” – an approach used in the classic English gardens at Hidcote and Sissinghurst. The design of the garden as a whole is about the location, shape, proportion and flow of these smaller spaces and the routes which connect them – but the character of each smaller space is unique, so the task becomes one of designing a series of small gardens;

  • secondly, even with a small garden, you’re as entitled as anyone else to desire an outside space that’s beautiful, enjoyable, restful, productive, property-enhancing, ... and so on.


Obviously, a small garden has a certain sense of scale and doesn’t provide the opportunity to have large trees, massed shrub plantings, swathes of bulky ornamental grasses, a wildflower meadow or an extensive pond – features that may well be used as part of the overall landscape between the garden rooms in larger estates – but that doesn’t mean they are free of design challenges. The training & experience of a professional garden designer can help to get the best from a small space in terms of usefulness, adaptability and adding value to the property.


If you fancy having a go yourself at achieving a more attractive result than the “2-foot-wide flower border around the fence with a randomly-shaped grass lawn alongside the builder’s patio” that’s often the norm for small suburban gardens, the other parts of this article will give a series of guidelines that will help you get there. You can easily reach them by clicking on the links at the top of this post.

Tuesday, 1 June 2010

Remarkable Renderworks by Daniel Jansenson


Renderworks is a “bolt-on” option to the Vectorworks computer aided design system from Nemetschek, of which I’ve previously written (see Residential Garden Design and Animations). Once a 3D model has been developed with Vectorworks, using the Renderworks component brings presentation images of the design to life - by adding textures to the surfaces of objects and creating depth through the lighting tools which give both general illumination to the scene and modelling to the highlight/shadow details.

Daniel Jansenson prepared this book for Nemetschek as part of their tutorial series. He is well-qualified for this, being an architect in private practice, a long-time Vectorworks user and a teacher of both Vectorworks and Renderworks. He’s also author of the earlier eBook “The Renderworks Recipe Book”.


Remarkable Renderworks is sub-titled “An Introduction to the Basics”, but – although it does indeed serve to help novices get to grips with Renderworks – it’s not a Vectorworks primer and, as stated in Daniel’s introduction, the manual is “intended for the Renderworks user who already has some experience with Vectorworks”. That said, I find it to be more than just a primer for Renderworks too – it has value as both revision & skills enhancement to those who already have some familiarity and experience with the Renderworks software.

Format and content ...

In common with other tutorial manuals from Nemetschek, the book is an excellent, A5-sized, spiral-bound, format - which lets it fold flat and occupy minimal desk space when working at a computer. It has some 33 chapters, or topics, which guide readers from the simplest forms of rendering through to the use of built-in (default) textures, creating your own custom textures, and applying textures to specific types of 3D objects. From here it goes on to explain lighting types and effects, for both interior & exterior scenes, before concluding with a treatise on the system’s capability to produce supremely realistic images via the Custom Renderworks & Custom Radiosity tools - and the trade-offs between ultimate realism and image processing time. Throughout the book there are high quality colour images of screen segments which make it very easy to follow through the exercises that are used to provide the tutorial.


Exercises and Software Versions ...

The exercise files are provided on a CD-ROM which accompanies the book. Although there’s no mention of software versions, as a newly published tutorial it is, naturally, designed to work with the current software, i.e. Vectorworks/Renderworks 2010, and the files are 2010 format – so if you have a prior version you will not be able to use them. Pre-2010 users can still get some benefit – anyone with Vectorworks experience can easily re-create the early chapters' exercise files. For later chapters, with more complex exercises, it may be more effective to just follow the principles and apply them to some of your own work – but note that there are significant changes and improvements to the tools and methods of working in the 2010 version which the tutorial is based upon.

.

At first, I was disappointed that the exercises did not represent a journey through a real-life project - being instead a series of mainly unrelated, simple, abstract models. However, after working through the book, I now recognise how well these are used to describe & teach the concepts – something which may have been more difficult to achieve, and perhaps more confusing, in a real-life example. It’s also worth saying that Renderworks is applicable to Vectorworks Fundamentals users, as well as those with Design-series options such as Architect, Landmark and Machine Design, so using abstract examples makes it more universal as a tutorial.

.

The more complex forms of light rendering are most appropriate to building interiors and the exercises are based on this. There is a chapter on exterior scene lighting, though this doesn’t add much to Tamsin Slatter’s excellent book on Residential Garden Design.


There are some improvements I can suggest for the next revision ...


  • There’s little reference to the wide range of (non-default) ready-made texture libraries which ship with the Vectorworks/Renderworks software, so you may be left thinking there’s a lot of work you have to do for yourself, which may not actually be the case.


  • As a garden designer, I’d have liked more information on using Renderworks to show exterior schemes in both daylight and “nightscape” scenes and some discussion of the effects / limitations of lighting used with the ”Image Props” that represent planting in 3D models.


  • My major criticism is the lack of an index, which limits its usefulness as a reference work. It is possible to skip-read chapters (which are only about 5-6 pages each) after skimming down the Table of Contents for a topic of concern, but it’s a tedious way of working and (unlike Tamsin’s book) the CD-ROM doesn’t include a searchable PDF version of the manual.

Conclusions:

Would I recommend this book? Yes!


Who would benefit from it? Anyone who already has enough Vectorworks experience to build 3D models and who wants to leverage their investment to produce, or improve the quality of, their design presentation images – whether they’re working in the field of architecture, interiors, or, like me, landscape/garden design.


Where can you get it? From Nemetschek.


.

Steve Rice, Blooming Good Gardens, Southampton, UK


Friday, 28 May 2010

Concrete Jungle: biodiversity through school gardens

Concrete Jungle is a new initiative to encourage schools to plant flowers and grow vegetables to create wildlife havens in their grounds. I’ve blogged before about the International Year of Biodiversity of which this campaign is a part. Concrete Jungle has been developed by Cool It Schools, a global programme for young people, encouraging them to do something about climate change. There’s a downloadable teacher’s pack with suggestions for developing a garden, and lesson plans and ideas to interest students.
I was particularly interested in this, since I’ve been developing a wildlife garden with a school which has now made real progress. After I set out the plot a group of volunteers set to with enthusiasm, and its hoped that the project will be completed this year.

Once schools have signed up with the Concrete Jungle campaign they can register the dimensions of their garden and use the site to show the progress they are making.

Monday, 17 May 2010

Birds in the garden

We've been having fun watching the birds on our feeders lately. One blackbird took a while learning how to get to the fat ball: approaching it from various angles he failed to get a grip; then he hovered alongside it, grabbing a bite before he fell back onto the ground; finally he learnt to land on the fat ball itself, and was able to nibble away easily.


The collared doves and blue tits have also been avid feeders.


If you feed the birds, don't forget to clean the feeders regularly to prevent disease. See the RSPB website for more information.

Tuesday, 4 May 2010

A great day out...Blashford Lakes

Sadly unable to get away on holiday, due to volcanic ash, we had the opportunity to explore some places closer to home, and discovered Blashford Lakes, near Ringwood. The weather that week was lovely – a real taste of summer.


The lakes are flooded gravel pits, managed by The Hampshire and Isle of Wight Wildlife Trust for the benefit of people and wildlife. There are 8 km of pathways round the reserve, most of them wheelchair-accessible, with hides for viewing the wildlife on and around the lakes (ramps also make the hides accessible). We had a wonderful time wandering through the woodland, and sitting in a couple of the hides, trying to identify the water fowl from the useful posters displayed on the walls. We saw goldeneye, coots, Canada geese, and swans, as well as a couple of scuttling rabbits on the bank. We also enjoyed watching the whirling house and sand martins nesting in the man-made walls alongside one of the hides. Diaries are left for visitors to record what they saw on particular days, and it’s fascinating to look through and discover what was seen at different times of the year.


I recommend taking a picnic – there are benches at frequent intervals along the trails, and picnic tables outside one of the education centres. We omitted to do that at first. Having arrived in the morning and liking it so much, we went off to buy food, and then came back for the afternoon. There are guided walks, talks and family events throughout the year, and courses for adults, including topics such as wild flowers and photography.


You can visit the lakes free-of-charge, although we were so delighted, we left a donation, since it’s a charitable concern. Although there are car parks, the Trust recommends walking or cycling. Blashford Lakes can be found two miles north of Ringwood on the A338 Ringwood-Salisbury Road, New Forest OS Map Grid Ref. SU 151 079.

Monday, 19 April 2010

Rain Garden Success

I shouldn't be here blogging. I should be in California, but I think something went wrong with the translation when we asked the Icelanders to "please give us back our cash"!


Back in August last year, I blogged the article on Rain Gardens which I'd written for my local newsletter. I've just written a follow up piece to say how the garden "performed" through the winter, so here it is:


As we’ve now come through the winter and spring is with us at last, I thought you might be interested to know how it got on. Well, I’m pleased to say it’s good news! The rain cups looked terrific, both in gentle rain – when the water trickled and splashed through - and in heavy downpours – when it formed a solid column through the centre of the rain cups. The rain cups also had another practical use – in light rain or drizzle, when it wasn’t easy to tell whether it was raining or not, a glance through the window at them would readily give the answer, as directing the run-off from part of my bungalow roof through them “magnified” the rainfall effect. In heavy / sustained rain, the rill and rain garden do flood, as intended, covering the cobbles and (apologies to residents in Peterscroft, etc for “rubbing it in”) the ground beneath the rain garden is sufficiently permeable to allow this ponding to infiltrate and clear in about 6-12 hours after the rain stops.


So the mechanics of the rainwater collection and dissipation work fine, but what about the rain garden plants – how did they cope with continual flooding?


Once again, I’m happy to say, mainly successful. All but two of the species have come through and are now re-growing strongly. The ones which failed are a Verbascum (which I didn’t really expect would survive, and only included as a pretty summer plant with height) and a Hebe (H. carnea ‘Varigata’) which isn’t showing any signs of life, and was probably a poor choice – even though I’d planted it at the edge where it was less prone to flooding. Maybe it was the frosts rather than the wet which did for it? The successful plants, which “baked” through the end of summer last year, and survived the flooding of the winter, are: Calamagrostis acutiflora, Campanula lactiflora ‘Loddon Anna’, Carex ‘Evergold’, Cornus alba ‘Aurea’, Hemerocallis ‘Crimson Pirate’, Hypericum inodorum ‘Magical Red Star’, Pennisetum ‘Red Buttons’, Philadelphus ‘Belle Etoile’, Physocarpus ‘Diabolo’, Rudbeckia fulgida ‘Goldsturm’, Sambucus ‘Black Lace’, Sedum ‘Xenox’ and Tradescantia ‘Sweet Kate’. I can’t guarantee that these would always survive in extreme conditions, but you might like to investigate them if you have difficult areas to plant.


Another part of the change to my front garden was laying a decked pathway to a small decked sitting area in the “alcove” of the bungalow. For this I used “Millboard” composite decking - which has the look of old oak boards but is, in fact, manufactured from waste hardwood and recycled plastic. This has the advantage of being very long life, doesn’t warp, split, rot or fade and, unlike timber decking, is very non-slip. It’s also claimed to be a low-energy manufacturing process and, as the boards don’t need any oil or chemical treatments, seemed to me to have fairly good sustainability credentials. The purpose of the small sitting deck, which faces to the west, was to allow us to glory in the late afternoon / evening sun after it’s left our back garden. Once we’d overcome our initial reticence at being “on display” in the front garden, we found it to be a really good social feature – with people passing by stopping to chat and neighbours joining us for a cuppa or glass of wine.


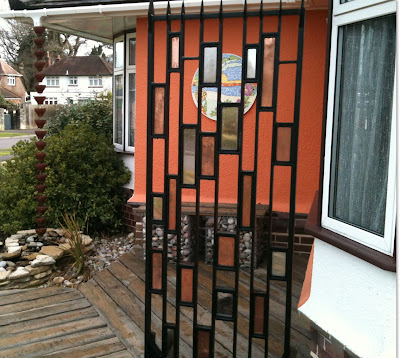
We’ve recently completed this feature with a copper and stainless steel screen panel at the edge of the sitting deck. I commissioned the panel from my designer-blacksmith neighbour, Colin Phillips, having designed it myself based on part of some gates which Colin had previously made. You can see the genesis of this on my last blog post.


The final piece of redesign for this section of my garden was stripping away most of the lawn to give wider borders around the rain garden and decked path. These were very successful last summer - with flowers such as Borage, Nasturtium and California Poppy providing nectar sources for bees and butterflies. I’ve now added a series of “Minarette” fruit trees (Cherries, Gages and Plums) and a small standard Cherry. I know that it wouldn’t look good to protect these with netting in my front garden, so I reckon to share any crops with the birds – part of my contribution to International Year of Biodiversity!


If you’ve not heard of the latter, 2010 has been designated “International Year of Biodiversity”, by the United Nations, to call attention to the accelerating decline in biodiversity – mainly through human activities such as industrial monoculture food growing, pesticide usage and destruction of habitat. The retention of diverse flora & fauna throughout the world is vital to the human species, as much as to other living creatures, as we depend upon networks of other plants and animals for our food, energy and medicines. To find out more about “IYB” and how you could help please visit my previous blog piece

Thursday, 1 April 2010

Using Vectorworks to Montage Designs & Photos

I've found that I can exploit my skills with Vectorworks to combine designs with photo images, making it much easier to show a designed feature "in situ" when it's not appropriate to develop a full design model.

As part of my garden designs, there’s almost always some form of structure required to provide a specific function – for example “built-in” tables & benches for a deck; planter-walls to help define a shape; a pergola over a pathway to frame a view and give vertical planting support; a gazebo to stop and take in the views and to act as a focal point itself; or a screening panel to enclose an area or separate it from another space with different character.

All of these items are part of the overall design concept, which is unique to that property, and will therefore “belong” to the garden even if they are made from widely-available component parts.

Sometimes though, either for practical reasons such as specific dimensions, or aesthetic reasons like needing a particular material / texture / form / etc, only a bespoke piece will work. Often this will be a timber or masonry construction, but I’ve also designed using plastics, ceramics and metals.

One recent example was a small screen panel which I commissioned from Colin Phillips, a designer-blacksmith.

The screen was needed to finish off the return edge alongside a small decked area which you can see in this picture.

I wanted to tie in with the terracotta colour of the alcove wall and the copper rain cups, so I decided on a series of randomly-sized copper & stainless steel sheets set inside a black steel framework – in a kind of “Mondrian meets Rennie Mackintosh” style.

The basis for this was taken, with his permission, from part of some gates pictured on Colin’s website.


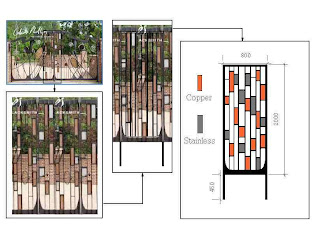
I thought it would be interesting to show how I took this through to the finished piece – all done using the Vectorworks CAD package, with Windows Photo Gallery to crop pictures – not even a hint of Photoshop!


First step was to copy the website picture to the Windows clipboard and paste in into a blank Vectorworks layer, which I then exported back as a JPEG image.

Next, I cropped the central bit of the gates, shown above as a black rectangular frame, using Windows Photo Gallery and imported this back into Vectorworks. I then used the Vectorworks “edit – duplicate” function to copy it, and shifted the duplicate sideways to create the rounded base shape with asymmetric left & right sides shown under the original picture of the gates. With these images selected, I used the “modify – scale objects” function to re-size the pictures so that the vertical dimension matched my requirements of 2 metres.

I could then trace over the image to get the basic “ladder” form that interested me before deleting the photo images of the gates and working on to produce my final design.


Once the design was completed, I imported the original photo of the deck area to another layer, again used “modify – scale objects” to resize it - using the brickwork alongside the screen position as a measurement guide - and duplicated the screen design onto this layer, moving it around to superimpose it in the correct position.


Finally I cropped this layer, using a viewport, and printed it to show my client, before commissioning the piece.


The final picture is the finished install of the custom-made screen.