I shouldn't be here blogging. I should be in California, but I think something went wrong with the translation when we asked the Icelanders to "please give us back our cash"!
Back in August last year, I blogged the article on Rain Gardens which I'd written for my local newsletter. I've just written a follow up piece to say how the garden "performed" through the winter, so here it is:
Back in August last year, I blogged the article on Rain Gardens which I'd written for my local newsletter. I've just written a follow up piece to say how the garden "performed" through the winter, so here it is:
As we’ve now come through the winter and spring is with us at last, I thought you might be interested to know how it got on. Well, I’m pleased to say it’s good news! The rain cups looked terrific, both in gentle rain – when the water trickled and splashed through - and in heavy downpours – when it formed a solid column through the centre of the rain cups. The rain cups also had another practical use – in light rain or drizzle, when it wasn’t easy to tell whether it was raining or not, a glance through the window at them would readily give the answer, as directing the run-off from part of my bungalow roof through them “magnified” the rainfall effect. In heavy / sustained rain, the rill and rain garden do flood, as intended, covering the cobbles and (apologies to residents in Peterscroft, etc for “rubbing it in”) the ground beneath the rain garden is sufficiently permeable to allow this ponding to infiltrate and clear in about 6-12 hours after the rain stops.
So the mechanics of the rainwater collection and dissipation work fine, but what about the rain garden plants – how did they cope with continual flooding?
Once again, I’m happy to say, mainly successful. All but two of the species have come through and are now re-growing strongly. The ones which failed are a Verbascum (which I didn’t really expect would survive, and only included as a pretty summer plant with height) and a Hebe (H. carnea ‘Varigata’) which isn’t showing any signs of life, and was probably a poor choice – even though I’d planted it at the edge where it was less prone to flooding. Maybe it was the frosts rather than the wet which did for it? The successful plants, which “baked” through the end of summer last year, and survived the flooding of the winter, are: Calamagrostis acutiflora, Campanula lactiflora ‘Loddon Anna’, Carex ‘Evergold’, Cornus alba ‘Aurea’, Hemerocallis ‘Crimson Pirate’, Hypericum inodorum ‘Magical Red Star’, Pennisetum ‘Red Buttons’, Philadelphus ‘Belle Etoile’, Physocarpus ‘Diabolo’, Rudbeckia fulgida ‘Goldsturm’, Sambucus ‘Black Lace’, Sedum ‘Xenox’ and Tradescantia ‘Sweet Kate’. I can’t guarantee that these would always survive in extreme conditions, but you might like to investigate them if you have difficult areas to plant.
Another part of the change to my front garden was laying a decked pathway to a small decked sitting area in the “alcove” of the bungalow. For this I used “Millboard” composite decking - which has the look of old oak boards but is, in fact, manufactured from waste hardwood and recycled plastic. This has the advantage of being very long life, doesn’t warp, split, rot or fade and, unlike timber decking, is very non-slip. It’s also claimed to be a low-energy manufacturing process and, as the boards don’t need any oil or chemical treatments, seemed to me to have fairly good sustainability credentials. The purpose of the small sitting deck, which faces to the west, was to allow us to glory in the late afternoon / evening sun after it’s left our back garden. Once we’d overcome our initial reticence at being “on display” in the front garden, we found it to be a really good social feature – with people passing by stopping to chat and neighbours joining us for a cuppa or glass of wine.
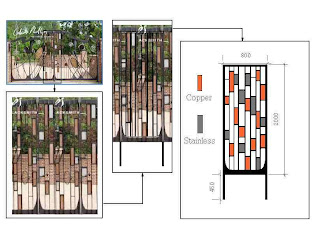
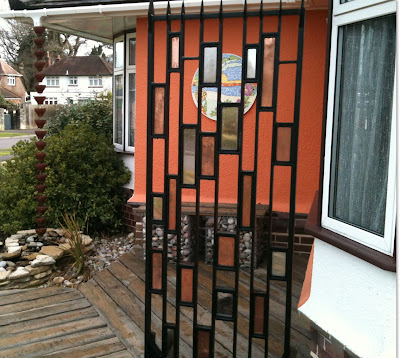
We’ve recently completed this feature with a copper and stainless steel screen panel at the edge of the sitting deck. I commissioned the panel from my designer-blacksmith neighbour, Colin Phillips, having designed it myself based on part of some gates which Colin had previously made. You can see the genesis of this on my last blog post.
The final piece of redesign for this section of my garden was stripping away most of the lawn to give wider borders around the rain garden and decked path. These were very successful last summer - with flowers such as Borage, Nasturtium and California Poppy providing nectar sources for bees and butterflies. I’ve now added a series of “Minarette” fruit trees (Cherries, Gages and Plums) and a small standard Cherry. I know that it wouldn’t look good to protect these with netting in my front garden, so I reckon to share any crops with the birds – part of my contribution to International Year of Biodiversity!
If you’ve not heard of the latter, 2010 has been designated “International Year of Biodiversity”, by the United Nations, to call attention to the accelerating decline in biodiversity – mainly through human activities such as industrial monoculture food growing, pesticide usage and destruction of habitat. The retention of diverse flora & fauna throughout the world is vital to the human species, as much as to other living creatures, as we depend upon networks of other plants and animals for our food, energy and medicines. To find out more about “IYB” and how you could help please visit my previous blog piece


